The high top fade dominated hip hop’s golden era from 1986 to 1993 and has made a serious comeback in today’s men’s grooming scene. Artists like Kid ‘N Play and Big Daddy Kane first made this iconic cut famous, turning it into a symbol of rap culture across major urban centers like New York City, Washington D.C., and Philadelphia.
High fade haircuts have exploded in popularity since 2020. You’ll find countless variations from the sharp high skin fade to the classic high top taper fade that work with all different hair types. The style has crossed into mainstream sports too – NBA players Nerlens Noel and Jaylen Brown rock their own high top styles, showing how this versatile cut works across different decades and groups.
This barber’s guide gives you my professional secrets for nailing the perfect high fade cut. You’ll get step-by-step instructions whether you want the geometric precision of late 80s styles or a modern version that matches your personal look. Get ready to turn heads with this timeless haircut!
Step 1: Prepare for the Cut
Proper preparation makes all the difference when getting your high top fade. This iconic style needs specific prep work to guarantee you get exactly the look you want.
Wash and detangle the hair

Clean hair gives your barber the best canvas to work with. Wash your hair thoroughly before your appointment to remove any product, dirt, or oils that might get in the way of a perfect cut. Your barber needs a clear view of your natural texture and how your hair falls. If you have drier hair, keep a spray bottle handy and spritz to make your hair more manageable. Then use an afro pick to completely detangle any knots.
Make sure your hair is fully dry before sitting in the barber chair. Wet hair affects how scissors move through it and often leads to uneven cuts. Stick with lukewarm or cold water instead of hot water when washing – hot water opens hair cuticles and creates styling problems later.
Decide on the height and shape
Your high top fade needs longer hair on top for volume, with shorter sides for the fade effect. Think about your face shape and hair type before your appointment since these factors directly impact how your high fade will look.
Mid and high fades work best if you have thinning hair. Your face shape matters too – high fades highlight your natural face structure, while low fades blend better with medium or longer top styles. Not sure what works for you? Mid fades are versatile and match almost any hair length.
Discuss the look with your barber
Good communication gets you the high top fade you really want. Bring pictures to your appointment so you and your barber understand exactly what you’re aiming for. Tell them clearly where the fade should start and end, plus how you plan to style the top.
Know the specifics like guard numbers and neckline shape before you sit down. Think about your lifestyle when picking your style – high fades need more frequent touch-ups than lower versions. Many barbers keep notes on your haircut details to maintain consistency when you return.
Ask your barber for their professional opinion based on your hair texture and face shape. They know exactly how to create the perfect high top fade that suits you best.
Step 2: Mastering the Fade Technique
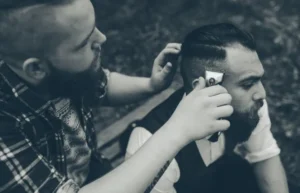
Creating the perfect high top fade comes down to precision and technique. The cutting process separates an ordinary haircut from a style that turns heads.
Start with the high fade cut
The foundation of any great high top fade starts with picking the right guard size. For a classic high fade, I typically use a #1 or #2 guard for the shortest parts near the ears and neckline. This sets your baseline length before building the gradient.
To create the fade:
- Start cutting at the bottom of the sides, keeping the clippers flat against the scalp
- Move upward using smooth, even strokes with consistent pressure
- Work methodically around the head to establish your initial length
- Make a clear fade line where you want the transition to begin
For a true high fade, put this line above the temples instead of at ear level. This creates more dramatic contrast with the fuller top while making the face look longer perfect for square or round face shapes.
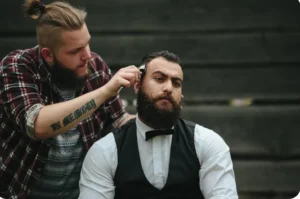
Blend the sides into the top

Blending is where skill meets artistry. To get that seamless transition:
Switch to a slightly longer guard (usually one size up) and work just above your initial fade line. The key move here is the “flicking” motion—when you reach the transition point, gently flick the clippers outward with a scooping action to create a gradual blend instead of a harsh line.
Keep going with progressively longer guards as you move upward. For high top fades specifically, maintain a clear separation between sides and top, but make sure the transition looks natural. Your blending zone should be clean yet gradual.
Use the corner edge of your clippers when working around curved areas like the back of the head or behind the ears. This prevents awkward corners or dents in your fade.
Use a trimmer for clean edges
The finishing touches take your high top fade from good to exceptional. Once the main fade is done, grab your trimmer to:
Clean up the edges around the ears for sharp, even lines. Define the sideburns with precise edges that match your face shape. Create a crisp neckline that enhances the overall sharpness of the cut.
For high top styles specifically, the transition from trimmed edges to the fuller top must be perfect. Pay extra attention to the temples and corners, as these areas frame the face and showcase the dramatic contrast that makes high top fades so striking.
Remember that detailing isn’t just about cleaning it’s about creating definition that highlights the structure of your high top fade.
Step 3: Style and Customize Your High Top
Styling takes your high top fade from basic to eye-catching. The perfect high top needs volume, definition, and personal touches that make it yours.
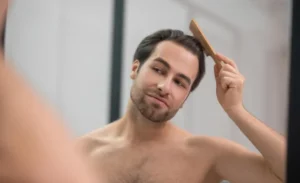
Pick out the top for volume
Volume is everything for a high top fade. Spritz slightly dry hair with water to make it more workable, especially if your hair tends to be dry. Then use an afro pick to work through your hair until it’s completely tangle-free.
Start at the roots and work upward with even tension throughout. Focus on fluffing the crown area to get maximum height. Your picking technique matters – use consistent, gentle strokes for uniform volume without damaging your hair.
Add a part or design for flair
Today’s high top fades often feature personal details. A clean, straight part down the center creates symmetry and visual interest. For something bolder, try curved lines framing the fade or geometric patterns along the sides.
Think of designs as artistic elements made of straight lines and curves – similar to C’s, Z’s, and cursive patterns. Keep it simple – a clean, basic pattern looks more polished than complicated designs.
Use pomade or gel for hold
Pick your product based on the finish and hold you want. Water-based pomade gives flexible, reworkable style with medium shine. Gel offers stronger hold but less flexibility for a more defined look.
Application makes a big difference – use just a fingertip amount since too much weighs down your high top. Rub the product between your palms first to emulsify it properly. For pomade, use a scrunching method starting at the tips and working through the crown. Apply to dry hair for more texture and separation or slightly damp hair for more shine.
These styling techniques keep your high top fade standing tall and showing off your personal style all day.
Step 4: Maintain Your High Top Fade

Your high top fade won’t stay sharp without proper maintenance. Even the best cut quickly loses its impact if you skip the upkeep.
How often to visit the barber
You need regular barber visits every 3-4 weeks to keep your high top fade looking crisp. Your hair growth rate and style choice determine exactly how often you’ll need a touch-up. For shorter, more dramatic high skin fades, you might need weekly visits to maintain that clean contrast between the sides and top.
High fades show regrowth faster than lower variations, so you can’t skip appointments. Scheduling regular visits also makes future cuts more efficient since your barber gets familiar with your specific fade pattern.
Daily care and night protection
Daily moisturizing keeps your scalp healthy and your fade looking fresh. Use a lightweight moisturizer with natural ingredients like aloe vera or jojoba oil to prevent flakiness. When styling, just use a fingertip amount of product – too much weighs down your high top.
Nighttime protection matters just as much. Your hair actually gets damaged more during sleep than during the day. Try these protection methods:
- Sleep on a silk or satin pillowcase to cut down on friction
- Wrap your hair in a satin head scarf or bonnet
- Never sleep with wet hair – it breaks more easily
Fixing uneven growth or shape
You’ll sometimes notice uneven growth, especially if your hair naturally grows at different rates. Don’t try DIY fixes – they usually make things worse. Talk to your barber about solutions instead.
For minor unevenness, a good barber can balance both sides without cutting too much length. If you’ve got major asymmetry, you might need to start over with a lower taper and let it grow out evenly. This feels disappointing at first but creates a better foundation for your next high top fade.
Remember that keeping those precise lines and smooth gradient takes patience and consistency – but the head-turning results make it worth the effort.
Conclusion
The high top fade ranks as one of the most iconic hairstyles in men’s grooming history. This guide walked you through every step to achieve this classic look. Proper preparation creates the foundation for success – you need clean, detangled hair and clear communication with your barber to get the results you want. Mastering the fade technique demands precision, especially with guard sizes and blending methods that create that signature gradient.
Styling takes your basic cut and turns it into something personal. Your high top fade becomes uniquely yours whether you stick with a classic geometric shape or add modern details like parts and designs. The right products give you necessary hold without weighing down your style.
Maintenance is the real secret to keeping your high top fade looking sharp. Schedule regular barber visits every 3-4 weeks, protect your hair at night, and moisturize daily to keep your cut fresh between appointments. Even the best high top fade loses its impact fast without proper care.
This versatile style works with different hair types, face shapes, and personal preferences. Feel free to try variations that match your unique features. Remember that patience during growing and maintenance phases gives you the best results.
You now have all the professional insights and step-by-step guidance needed to rock this timeless look with confidence. Your perfect high top fade awaits – whether you’re channeling old school hip hop vibes or creating your own modern interpretation!